Disconnect Wardogs External separates aiming, player information and radar into different control groups. If your distance labels overlap names, start with their placement. If your radar markers are hard to read, start with the radar controls. Changing everything at once makes a simple display problem harder to identify.
This guide explains named controls from the Disconnect Wardogs External specification, with a walkthrough of the menu image below. For prices, compatibility and gameplay videos, use the Wardogs cheats overview. For installation, go directly to the Wardogs External setup guide.
Find the right group before changing a setting
- Target selection and aim movement: Target Bones, Lock Target, Aimbot Smoothing, Aimbot Deadzone, Aimbot Max Distance and Aimbot FOV.
- Targeting indicators: FOV Circle, Target Line and their colors.
- Player groups: Show Squad, Show Faction, Show Wounded Enemy and Show Wounded Friendly.
- Player labels and outlines: Name ESP, Faction Tag, Box ESP, Skeleton ESP, Distance ESP and Health Bar.
- Radar presentation: Player Size, Render Radius, Render Distance and Background Transparency.
- Reusing settings: Save Configs, Load Configs and Multiple Config Support.
Use the controls and scales in your current Wardogs menu; Rust settings are not interchangeable with them.
Read the Visuals menu in the screenshot
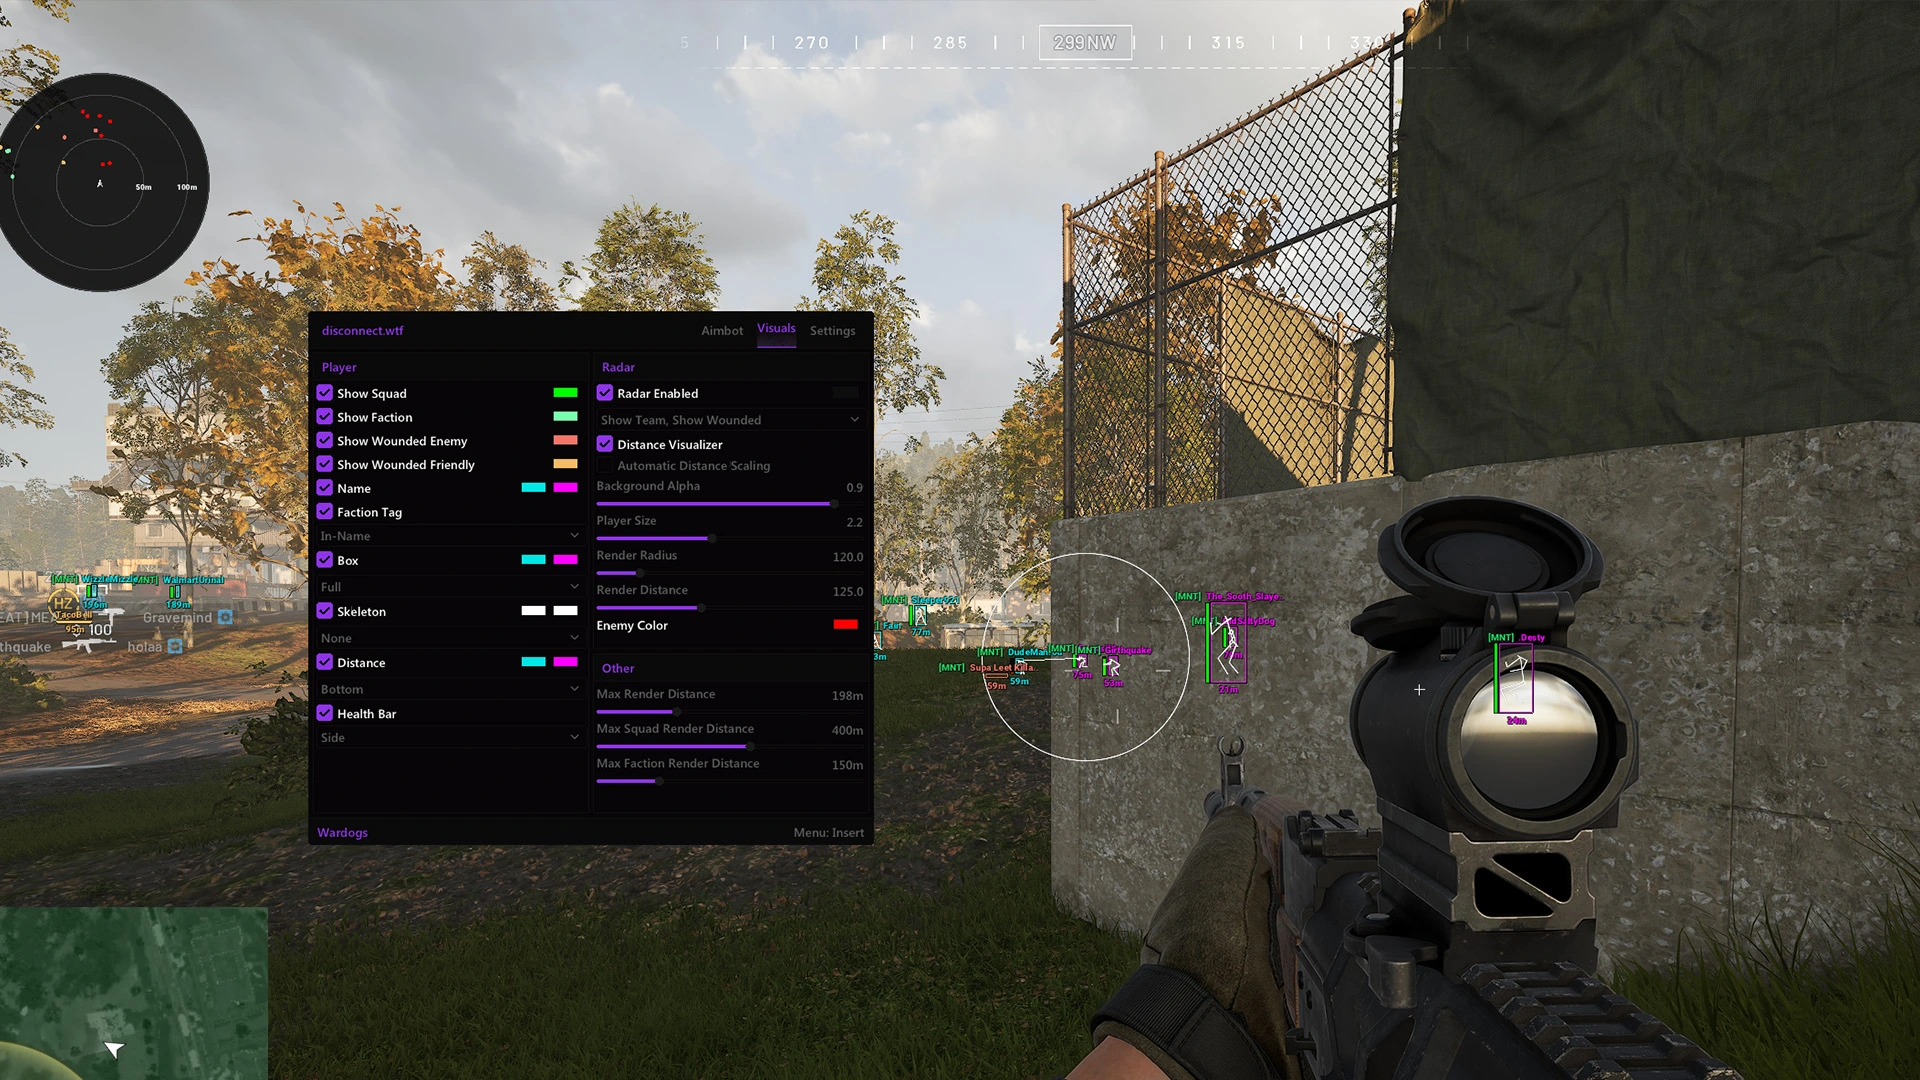
The left column contains player filters and labels. The right column contains radar controls. The circular radar is visible in the top-left corner of the game view.
Use these landmarks to understand the image:
- Player group switches: Show Squad and Show Faction appear above the two wounded-player switches in the left column.
- Label positions: the pictured Distance selector reads Bottom, while Health Bar reads Side. These are positions in this captured configuration, not required settings.
- Radar controls: Player Size, Render Radius and Render Distance are separate sliders on the right. The circular display also shows distance rings.
- Scene markers: names, distances and boxes appear around players outside the menu. They are a different view of information from the circular radar.
The pictured values are one configuration, not a preset you need to copy.
Example: separate a crowded name and distance label
Distance Position offers options for Right Side, Top, Bottom and In-Name. Faction Tag Type separately offers In-Name or Left Side. That gives you a concrete place to start when several fields occupy one line.
- Save your current layout through the config controls so you can return to it.
- Leave the player-group switches unchanged while testing label placement.
- If distance is placed in the name, compare Bottom or Right Side. The screenshot above shows the Bottom arrangement.
- Check Faction Tag placement independently. Move it only if it still competes with the name or distance.
- Review ESP Font Size after the fields have space. Then save the layout you can read more easily.
Label placement and range are separate: use Max Render Distance when you want to review how far markers are shown.
Squad, faction and wounded-player filters
Show Squad and Show Faction select different player groups. Show Wounded Enemy and Show Wounded Friendly give wounded players separate controls. The Customization list provides Squad Color, Faction Color and colors for both wounded groups.
If a group is missing from the overlay, review its switch before changing unrelated aim settings. If it is present but difficult to distinguish, review its color and faction tag. Skeleton Targets also lists Friendly and Wounded options, so an enabled skeleton display should not be assumed to include every group automatically.
Keep relationship and condition readable together. For example, turning on a wounded-player label does not replace the information supplied by a faction tag or a health bar.
Radar controls: markers, background and range
The Radar group lists Show Team, Show Wounded, Distance Visualizer and Automatic Distance Scaling, along with size, distance and color controls.
For a crowded or faint radar, identify the part that needs attention:
- Player Size concerns the markers you are reading.
- Background Transparency and Radar Background Color concern the panel behind them.
- Render Radius and Render Distance are separate controls; do not assume changing one changes both the display's size and its represented range.
- Show Team and Show Wounded concern which supported groups are included in that view.
In the screenshot, background transparency is labelled Background Alpha. It sits above the radar marker-size slider.
A listed radar does not promise a full-map view or vehicle tracking. Use the current specification when an additional entity type matters to your purchase.
Targeting and its indicators
The Aimbot list includes target bones for Head, Chest and Pelvis, plus Lock Target, smoothing, deadzone, maximum distance, Dynamic FOV and Aimbot FOV. FOV Circle and Target Line have separate color settings in Customization.
If the circle blends into the scene, its color is the relevant display control. If your question concerns the selection area or distance, use the corresponding targeting control. If you are unsure how two targeting modes combine, ask about those specific controls instead of copying a preset from another product.
Save the result and keep setup separate
Use Save Configs and Load Configs to compare layouts without rebuilding them from memory. Keep a note of what changed between versions. After a product update, check that the restored layout still matches the current menu.
If the entire menu or ESP never appears, return to the Wardogs setup guide rather than tuning a display you cannot see. Its current instructions specify Discord Legacy Overlay, and explain what to do if that option is missing. Rust External's SteelSeries instructions are for a different product.
Use the status page for the reported operational state. A smaller overlay or smoother setting does not establish undetected status or guarantee account safety.
What to Check When Wardogs ESP Is Missing Players
Start with what is still visible. A player box without a name points to a different display control from an entirely missing squad member.
- Identify the affected group, then check Show Squad, Show Faction or the matching wounded-player switch. Review Skeleton Targets separately if only skeletons are missing.
- Check the affected label or outline: Name ESP, Box ESP, Distance ESP and Health Bar are individual controls. Review color and font size if the marker is present but hard to read.
- Review Max Render Distance for scene markers and the radar's Render Distance for radar markers. An aimbot distance setting addresses targeting, so it is not the first control to change for a missing ESP label.
- If the problem began after loading a saved config, check those choices in the restored layout. Note one change at a time so you can tell which affected the display.
If neither the menu nor any ESP appears, use the product-specific setup guide and current status notice linked above. Send support the missing group, whether radar still appears and the last setup step that worked. Keep your license key private.
Sources and Review Method
The Nano Cheats Team prepared this guide for the Disconnect Wardogs External license sold in our store. Control names come from its product specification. The Visuals walkthrough describes the menu screenshot shown above, and the setup link points to this product's own instructions.
The display example is a way to review individual controls, not a tested numeric preset or a guarantee about detection. After an update, compare this explanation with your current menu and the linked product instructions. If a name, option or overlay step has changed, contact our support team with the exact product and setting.
Frequently Asked Questions
Can I show wounded friendlies separately from wounded enemies?
The specification lists Show Wounded Friendly and Show Wounded Enemy separately, with corresponding color options. Check those switches and colors when reviewing the player display.
Can I move the distance away from the player's name?
Yes. Distance Position lists Right Side, Top, Bottom and In-Name. The illustrated configuration uses Bottom; choose by readability rather than treating that screenshot as a required preset.
Where are current prices and system requirements?
The Wardogs information page includes the purchase overview, and the product page contains the full specification and selectable licenses.